The Battle
of Gronau - Part of a Cold War Commander campaign
After Action
Report
Sirs, the
little that is left of our command is in full retreat from Gronau. After 2
previous attempts, Soviet hordes finally massed in force and have crossed the
river and are breaking through to Western Germany! Urgent reinforcements
requested!
Thanks to Brigadier
G (Genghis) Kamden again for another good game. And to his dog Fenrir for
providing much needed distraction from the slowly unfolding massacre on the
tabletop. This game could have otherwise been called, ‘How to make the best of
a lost cause’…
Things I
could have done differently. Not much, I can’t think of, given Genghis had
twice as many troops, and I had a somewhat difficult table to defend. My right
side (the southern flank) was pretty clear, although even here the field of
fire from my defensive line was somewhat broken up by hedges on either side of
the river. The town was always going to be hard to defend, so I figured the
best spot would be at the river crossing, and I would use my phantoms (newly
acquired and painted up) to bomb it, calling in artillery strikes as needed.
Looking at the West German army lists, the artillery observers are reasonable,
command value 8 I think, and to boost that I upgraded him (twice the cost) to a
9. One lesson learned here, detailed below! The air controllers, however, are
Soviet quality, at a 6. So I figured not worthwhile, and any air attacks would
be better as scheduled (pre plotted) rather than called in.
My left
flank, the northern flank, was difficult if not impossible to defend. The line of
trees/hedges cut my visibility, so I would have a very limited opportunity to
fire on things coming at me from this direction before they took cover.
Accepting this, I ordered a phantom strike for the second turn, which worked
out well, or as well as could be expected. I also had a recce unit placed on
the hill behind the trees, to observe anyone hiding behind them, which worked
out well, except for what you will read regarding my artillery below.
Anything
coming behind those trees on my left flank would have been basically impossible
to defend against, at least without placing a major effort to do so, and so
taking that effort from the centre and right side of the table. I figured
better to let them cross, and then when they attacked the town I would be in a
more defensible position at that stage, even if I had to defend a crossing over
the bridge from the front as well as from the northern flank.
Never
minding of course that Genghis’s principle objective would have been to break
through, and so he could have just driven off the table rather than turn the
flank and assault the town…
 |
| Gronau from behind German lines. You can see the line of trees running along the left flank screening everything behind it. |
 |
| The same view with trees and hedges which lined the river and screened so many fields of fire |
 |
| From the Soviet side along their Northern flank. You can see the hill about in the middle on the right edge of the table where the German recce deployed in a hope to be able to call in indirect fire to anything marching behind the line of trees. |
 |
| The vicious Fenrir of the Norse sagas. |
 |
The German lines from the northern (left) flank.
Blurry imaging a result of German camouflage? In the first turn I dropped a
fascam minefield just to the bottom of the picture (the north/left flank) as a
further screen/defense against having this flank turned. Which would almost
play a big role at the end of the game!
|
 |
The Soviet assault begins with a pair of Frogfoot
strikes just across the bridge, right on my positions in Gronau. Worse, Genghis
also targeted both his artillery batteries on the same location! And he would
do it for the rest of the game!
As it worked out all this bombardment did take a toll,
but for the most part, the bit that I had in the area survived. I lost 1
infantry carrier and 1 infantry stand I think in the first round, and then
toward the end of the game 1 anti-tank missile vehicle. Critically, the first
round also caught my artillery observer, making my artillery useless for the
rest of the game! With my few airstrikes scheduled, they weren’t available to
be called in, making that excellently placed recce stand on top of the hill to
the north almost useless…
|
 |
Another shot, where you can see the artillery observer
and infantry vehicle destroyed (the pair of black smokes, cotton balls, in the
middle just in front of the bridge).
The other colored red/yellow smokes represent units
being suppressed by all the fire.
|
 |
| and yes, one of those jets is a jaguar. What are the odds of
having 2 frogfoots! (actually I do have a mig27 in storage but its not painted
up yet…)
The grey streak (pipe cleaner) represents an air
defense missile. Missing. Also, I think with the exception of 1 turn, we forgot
to assess fire on Genghis’s attack aircraft from my air superiority…
|
 |
My redeye man portable air defense missile missing one
of Genghis’s Frogfoots. The right is the right/southern flank which I chose to
defend, and I had some concern about Genghis ordering an air assault between
the 2 concentrations…
|
 |
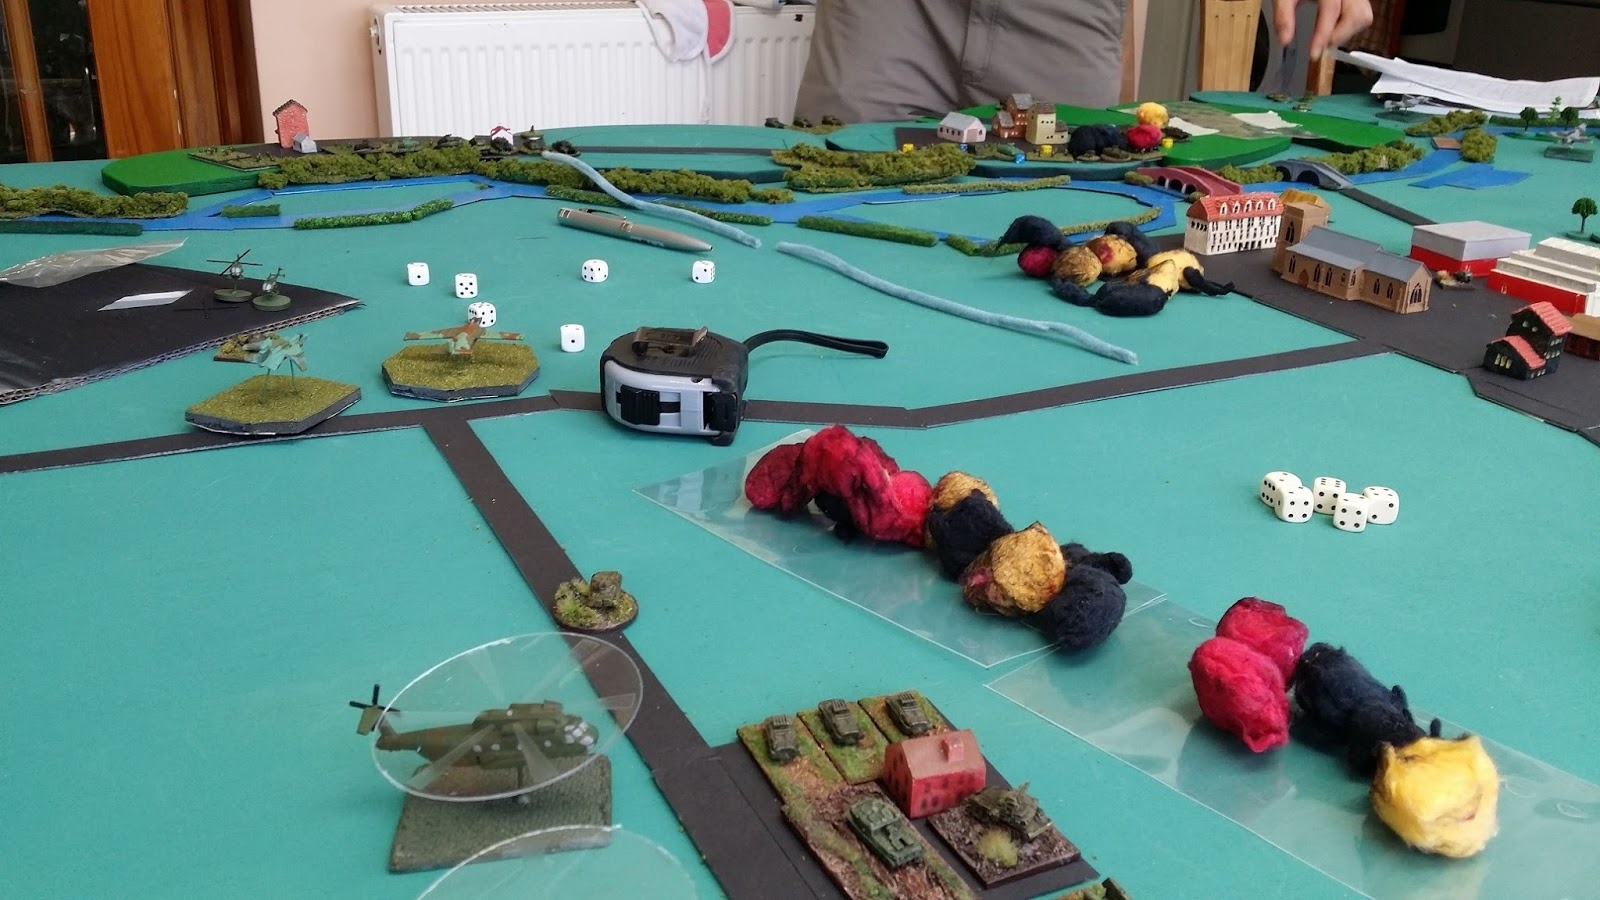
Rumblerumblerumble. The Soviet hordes appear! Oh ****
there’s a lot of them!
|
 |
Start of the second turn. My phantoms return. One
strikes the front of Gronau, where I expect Genghis’s troops to concentrate for
an assault across the river. Unfortunately, too soon…
|
 |
My other phantom strikes the little clump of woods on
the left flank, which I had so much concern about screening Genghis’s approach
on this side. I figured if I couldn’t shoot it, I could still bomb it! (with
the pre-plotted missions…)
This worked out well, but would have worked out much
better if I could have hit the tanks with something else to compound the
damage. Like requesting an artillery strike, sighted by the recce unit! Except Genghis
had already killed my artillery observer…
|

The phantom gets to work. Coloured smoke representing
suppression, mini dice representing hits. But nothing serious enough for a kill
(as mentioned, I needed to compound the damage somehow…) note we clear the
trees from the wood to make placing the cotton markers easier.

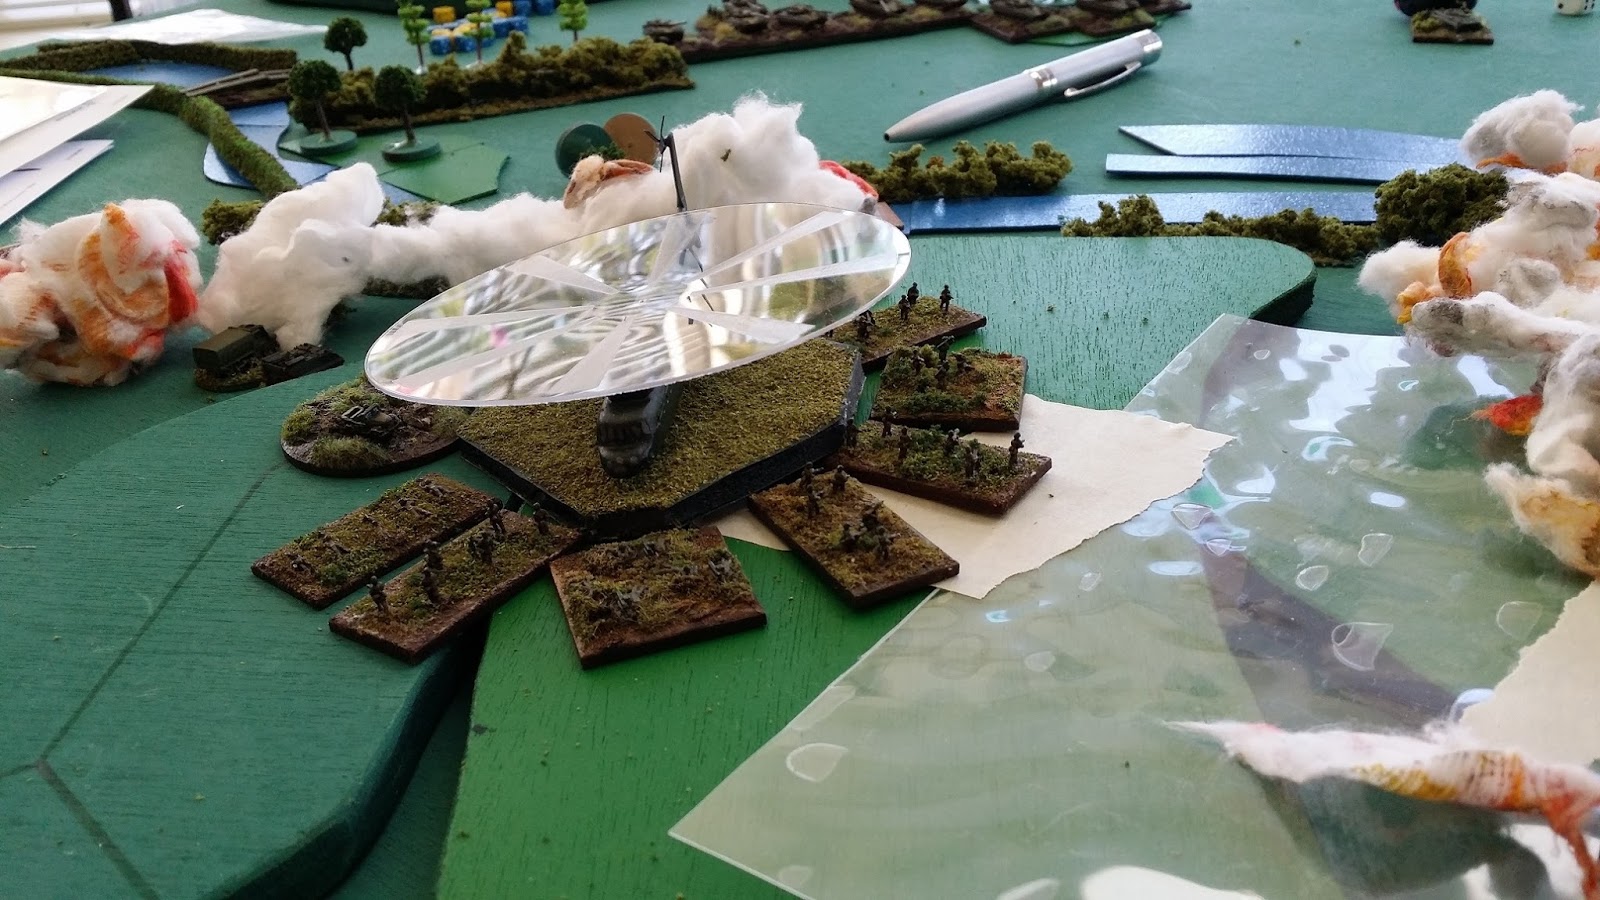
Speaking of pre-plotted missions, my air assault goes
in behind the Soviet southern flank! Of course, I didn’t expect the Soviets to
be still occupying that village given it was the far end of the table, rather
than advancing forward… Lucky for me, Genghis’s air defense was located on the
wrong side of the village, so my choppers were safe! Realistically, I didn’t
need 2, but the ch53 models are new, and I had a mission to get all the new
toys out on the table! I do think that having 2 helped split the loads, so that
if 1 got shot down, it wouldn’t have been a total loss…
 |
The Soviet view of my air assault. The coloured cotton
to the right represents a smoke screen to screen the landings from air defense
weapons.
|
 |
Not much happened after this, I don’t think. Or at
least I didn’t take pictures. There wasn’t much my ground forces could do, and Genghis’s
central command failed a command roll so couldn’t do anything.
He did, however, manage to call
in a pair of Hinds to hit my air assault force. My one little bit of bad luck
(aside from losing the artillery observer at the start of the game) was the air
assault command failing its command roll after getting out of the choppers.
Leaving them exposed in the open, whereas if they had passed the roll, they
could have gone into the town and assaulted Genghis’s anti-tank weapons and air
defense unit, and made mince meat out of them… |
 |
The casualties quickly start to mount from a pair of Hind
strikes Genghis urgently called in. Tragically, the entire assault force would be wiped out – those Hinds
can be very powerful! And infantry caught in the open can be very vulnerable…
|
So, to the start of Turn 3.
 |
My phantoms go in for their final mission, a cluster
bomb attack on the river front in Gronau, where I had expected Genghis’s
assault force to be concentrating. Note the added black smoke over 2 of my
units at the bottom of the picture. One, the truck toward the right, was a hq.
That doesn’t help the command!
|
 |
Genghis’s Hinds go in again, looking for targets on
the German right/southern flank. I don’t remember if they got anything, but
there were slim pickings with most troops hidden in the town or in/behind the
woods/hedges.
|
 |
Back to the German center. Hey what’s all that smoke
(the cotton streaky stuff) to the left? And what’s that enormous noise coming
from behind the smoke?
That would be Genghis’s Halo, his air assault from the
largest helicopter ever made… Note the strip of clear plastic between the helo
and the smoke. That was the fascam minefield I dropped at the very start of the
game! Good thinking! Unfortunately Genghis didn’t specify exactly where he
would land the assault, drawing up a box between smoke screens (you can see the
other side behind the helo). It was reasonably well specified, and fair enough.
So he rolled a die to see if he landed in the minefield or not, and
unfortunately for me he avoided it. It might still present a decent obstacle
though…
|
 |
Yikes! That Halo can carry a lot of guys! None of whom
were dumb enough to step in the minefield…
|
 |
Double yikes! Are those tanks coming up behind the air
assault? That was actually pretty well planned and executed…
|
 |
Genghis’s tanks streaming across the Leine river on
the north flank of the German line. Note the bridging unit helping them get
across.
|
 |
Things starting to look desperate for the German
centre. A few ko’d units, mechanized infantry with anti tank missiles
approachign from the front, while the air assault and tanks are approaching
from the north/left. Note the 1 infantry stand which noticed that while the
town was getting bombed, the ground just below on the riverbank (by the grey
stone bridge) wasn’t.
|
 |
A step back from the German centre, showing the
mechanized infantry across the river to the front, the airborne infantry to the
left, and the tanks behind them.
|

Basically, it was a tough task for the Germans to
defend against twice their number, on a table with a restricted view down the
left side, especially after their artillery observer, who I counted on to
provide support as needed especially on the left flank, got killed at the start
of the game.
The best option seemed to sit and wait and try and
take anything out as it came in.
It worked, kind of, but not nearly well enough. Genghis’s
tanks went along the north flank and came in on my left, and without artillery
support, the only thing I could hit them with was the luck of 1 of the
pre-plotted phantom missions. Although I did get 1 of the tanks that turn by
the recce unit calling in (from the cinc) a helicopter strike on the tanks (new
bo105s!).
His attack from the center came too slowly for my
phantoms to hit as their scheduled attacks came earlier, and then they were in
the town and I couldn’t see them any more to hit them. He hadn’t done much on
his left/southern flank, but then he didn’t need to as the tanks crossing in
the north, the airborne assault, and the mechanized infantry coming across the
river through the town in the center were all entirely too much.
I will say, as I was contemplating the table and how
to defend it, I did think that there were no easy ways for Genghis to attack.
He had to assume I was going to do something in the town in the center. He
actually said he expected me to defend more forward, which I considered, but it
wouldn’t give as good a defense since he would have been in the town too, and
being concentrated in the town in the middle would have limited my range of
fire to the flanks…
And he ought to have assumed I would do something,
like I did, to frustrate any advance along the north/his right, behind the line
of trees. As I actually did with the first phantom strike, and planned to do
with artillery if he hadn’t killed my ao.
Perhaps I could have dropped the fascam minefield more
forward, like along the tree line on the left, so making it irrelevant or,
better, catching anything he might already have there.
Obviously, I didn’t need the air assault toward Genghis’s
rear. But if it worked it would have been a big success. It would have wiped
out all his anti-tank weapons in that village, and would have provided an
excellent and lethal flanking shot into anything coming across that side of the
table, including potential anything going for a central assault through Gronau.
Even if Genghis routed his central assault through the middle of Gronau, so
hiding from my airborne assault, they doubtless would have attracted units to
beat off the flank shot. And that would have taken pressure off the center.
Air assaults are cool, and one of the doctrinal rules
is to get all the toys out on the table…
So it went in, and it was with a little bad luck that
they failed to immediately assault the town after getting out of the helos...
Obviously I didn’t need 2 phantoms, or even 2 ch53s to
conduct the air assault. But none of them were very expensive. And remember
doctrine says to get all the toys on the table, and arguably the phantom
strikes paid off (1 certainly did, and how would you know which 1 would have if
you pulled 1 out?)
Upgrading the artillery observer – I don’t think I’d
do that again. you get better odds of calling something in, but only slightly,
and at twice the cost. And at twice the cost, you can just buy a second
observer, again raising the odds of doing something, and making them twice as
hard to kill.
And perhaps I could have defended more forward. But
that would have been of little benefit as I couldn’t expect to drive all the
way through Gronau to the Soviet edge, so defending the town from its edge.
Instead I could expect to drive into it, and meet Genghis half way. Meaning he
would have the same benefit of cover as me. Actually it would have been worse
as I was counting on using fire from protected locations to take out what I
could of Genghis’s troops. And deploying more forward in the town would have
restricted my field of fire as well as be of limited benefit.
Deploying to my left I passed on and really couldn’t
see how to make it work. The hedges along both sides of the river meant you
couldn’t hide behind the river and shoot anything approaching it. Perhaps a
more forward minefield deployed there would have helped. But I gave myself only
1 fascam round (using more minefields I think starts to deny too much of the
table and make the game much less fun). And deploying it forward would have
meant not deploying it immediately to my left, which probably would have left
that flank open to attack somehow anyway, and certainly would have left it open
to a helicopter assault regardless, as actually happened. Indeed, that
minefield deployed on my left came very close to taking out Genghis’s air
assult all by itself.
Finally, I had much better luck with my command rolls
this time. Or should I say not nearly as bad luck as last time (which is kind
of funny, considering I sort of won that game, and completely lost this game!)
I did bring out the fancy new leather dice cup, and I
think it’s quite possible my dice wisened up at the threat of never being
thrown by hand again. Now I just have to remember to use it for other games,
especially ones without such a big concentration on throwing so many dice, like
king of the battlefield…
As it stands, however much I might feel I fought a
brave defense in a somewhat hopeless battle, Genghis planned well, executed
well, and beyond doubt blew through the German lines (almost not touching my
right flank, but who cares?)
I look forward to the next game, and where Genghis
decides to send his invading forces! My most important recommendation: start
learning Russian!
No comments:
Post a Comment